add-circle-bold add-circle add-square add alarm-bell-1 alert-diamond analytics-pie-2 archive archive arrow-down-1 arrow-down-2 arrow-left-1 arrow-right-1 arrow-up-1 attachment-1 bin-paper-1 book-star button-record check-1 check-circle-1 close close-quote close cog-1 cog common-file-stack copy-paste credit-card-1 diagram-fall-down disable time-clock-midnight download-thick-bottom drawer-send envelope-letter envelope-letter expand-6 expand-6 file-code filter-1 floppy-disk flying-insect-honey folder-file-1 headphones-customer-support hierarchy-9 hyperlink-2 information-circle keyboard-arrow-down keyboard-arrow-up layout-module-1 list-bullets lock-2 lock-unlock-1 love-it messages-bubble-square move-to-top multiple-circle multiple-neutral-1 multiple-users-1 navigation-menu-horizontal navigation-menu network-browser open-quote pencil-1 pencil-write pencil-1 print-text rating-star rating-star remove-circle remove-square-1 search send-email-1 shield-warning single-neutral-actions single-neutral smiley-sad-1 smiley-unhappy smiley-indifferent smiley-smile-1_1 smiley-happy smiley-sad-1 smiley-unhappy smiley-indifferent smiley-happy smiley-thrilled social-media-twitter synchronize-arrows-1 tags-double ticket-1 ticket-1 time-clock-circle undo view-1 view-off view wench

Coordinators: How to Complete a Report that Contains Confidential Facilitators and/or Locations

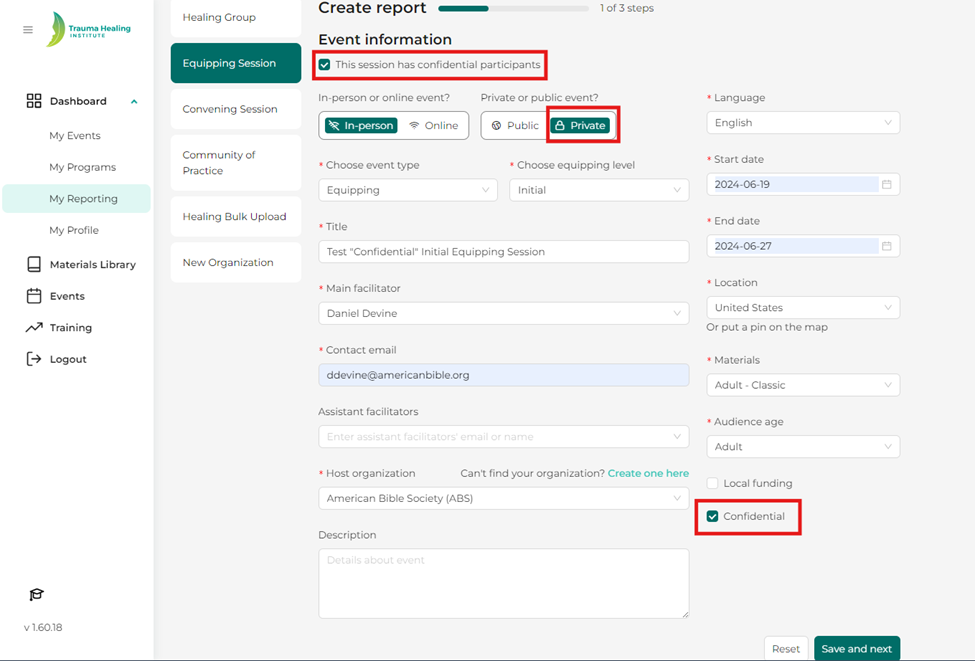
Step 1: When reporting an event that includes a confidential facilitator or location, start by checking the box “the session has confidential participants” and click the “Confidential” button at the end of the event information section. If the event was publicly listed, you would click public, but if any event was confidential, it is likely a “private” event.

Step 2: If participants do not have email addresses, use the “Full Name” option to add them. This feature is available for initial sessions. Simply enter the participant’s first and last name, and the system will create a placeholder email for them. If several participants have the same name, a number will be added to their name to avoid confusion. Remember, you can only add participants by name in initial sessions. For advanced sessions, the generated email addresses for these participants are required for entry. It’s important that you keep note of the email addresses generated for them. These email addresses can be found in their record in the THI Database. 

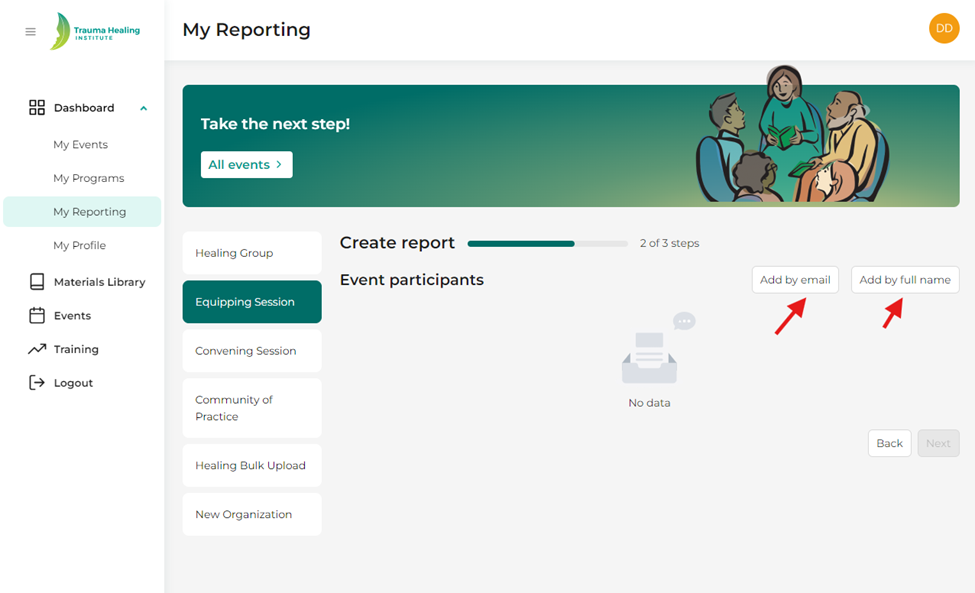
Step 3: Once the participants have been added, click “Save” and then “Next”. In the next section, you will assign lessons, set certificates, and, if needed, add a mentor for the participants, such as an apprentice facilitator.